Class IT Syllabus
Pressure Welder Certification
Overview
To obtain a Class IT Pressure Welder Certificate of Qualification, an applicant must successfully pass a welding examination. The welding examination is a performance qualification test complying with Section 41 of the Power Engineers, Boiler, Pressure Vessel and Refrigeration Safety Regulation. This syllabus details the requirements and standards for the performance qualification test that an applicant for a class IT Pressure welder certificate of qualification must pass.
Examination administration
The class IT pressure welder certificate of qualification test shall be administered by an organization accepted by Technical Safety BC as a recognized test administrator. The examiner (personnel) who administers the test shall meet the requirements outlined in the recognized test administrator’s quality control system manual for certification and experience.
Class IT Pressure Welder Certificate Examination
The following procedure outlines the manner in which the performance qualification test will be conducted by a recognized test administrator for the class IT pressure welder certificate of qualification examination.
Test coupon
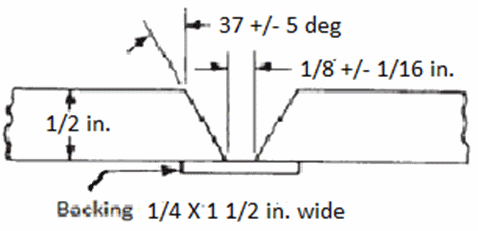
Three ½” thick, carbon steel plates, (P1 material) 6 inches in length prepared with approximately a 32 degree bevel to a feather edge to form a “V” groove test coupons will be welded. The test will be a single welded groove weld with a backing flat bar 8” long to allow for run off.

Test positions
Each test coupon will be welded in a different test position. The test positions shall be 2G, 3G and 4G as detailed in ASME Section IX Figure QW-461.3.
Electrodes
The electrodes used for the test shall be E-7018 (3/32” & 1/8” diameters). The candidate may select the diameter of rod for the root pass hot pass, fill and cap passes.
Examination time
Candidates will have 3.5 hours to prepare, tack, and weld the test coupons and one hour to prepare the bend specimens.
The performance test may be terminated at any stage of review, if it becomes apparent that the candidate does not have the required skill to produce satisfactory results or is taking an excessive length of time to complete any phase of the test.
Preparation and tacking
The three test coupons shall be tack welded before being placed in the positioner. When preparing coupons for tacking, the width of the root opening shall be 1/8 +/- 1/16 inches. The backing flat bar shall be securely tack welded to the test coupon plates at each end.
Welding
After the candidate completes tacking of the three coupons, they shall be presented to the examiner for evaluation.
After the examiner has accepted the coupon, it will be positioned for welding in the 2G position. The candidate will weld the horizontal (2G) root pass. When the candidate completes the 2G root pass, the coupon shall remain in the positioner and the weld shall be visually inspected by the examiner. The root pass shall be of uniform width and free of any grapes, craters, porosity, undercut or lack of fusion.
Providing the 2G root pass is acceptable, the candidate will then weld the hot pass, fill and cap passes of the coupon in the 2G position using a stringer bead method. The thickness of the deposited weld metal shall not be less than ½ inch and must be deposited with a minimum of three layers. The test coupon shall remain in the test position until the cap passes are visually inspected by the examiner. The cap passes shall be of uniform width, filled at least flush with a maximum reinforcement not exceeding 1/8” and free of any grapes, craters, porosity, undercut, and lack of fusion or arc strikes.
When the weld in the 2G position is completed and has been evaluated and accepted by the examiner, the candidate will position the second test coupon for welding in the 3G position. The coupon in the 3G position shall be welded using an uphill progression. When the candidate completes the 3G root pass, the coupon shall remain in the positioner and the weld shall be visually inspected by examiner. The root pass shall be of uniform width and free of any grapes, craters, porosity, undercut or lack of fusion.
Providing the 3G root pass is acceptable, the candidate will then weld the hot pass, fill and cap passes of the coupon using an uphill progression in the 3G position. The cap pass shall be completed using a weave method. The thickness of the deposited weld metal shall not be less than ½ inch and must be deposited with a minimum of three layers. The test coupon shall remain in the test position until the cap pass has been visually inspected by the examiner. The cap pass shall be of uniform width, filled at least flush with a maximum reinforcement not exceeding 1/8” and free of any grapes, craters, porosity, undercut, and lack of fusion or arc strikes.
When the weld in the 3G position is completed and has been evaluated and accepted by the examiner the candidate will position the third test coupon for welding in the 4G position. When the candidate completes the 4G root pass, the coupon shall remain in the positioner and the weld shall be visually inspected by the examiner. The root pass shall be of uniform width and free of any grapes, craters, porosity, undercut or lack of fusion.
Providing the 4G root pass is acceptable, the candidate will then weld the hot pass, fill and cap passes of the coupon in the 4G position in either stringer beads or a weaved method. The thickness of the deposited weld metal shall not be less than ½ inch and must be deposited with a minimum of three layers. The test coupon shall remain in the test position until the cap passes are visually inspected by the examiner. The cap passes shall be of uniform width, filled at least flush with a maximum reinforcement not exceeding 1/8” and free of any grapes, craters, porosity, undercut, and lack of fusion or arc strikes.
The candidate will present the three test coupons welded in the 2G, 3G and 4G positions to the examiner who shall mark out and stamp the bend test specimen locations in each test coupon.
Note: If agreed upon with the examiner, the candidate may choose to weld on all three test positions simultaneously.
Bend testing specimens
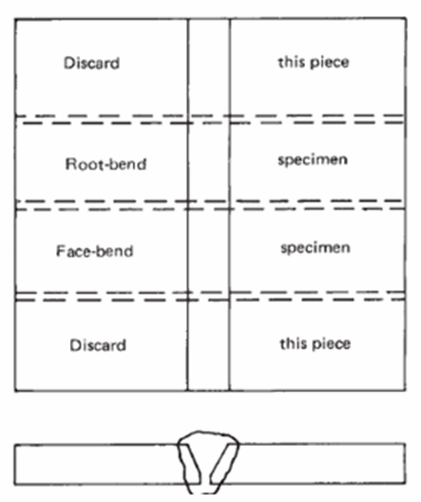
Two bend test specimens are required for each test position. The test specimens shall be examined using one face bend test and one root bend test. Each weld test specimen will be marked on the coupon by the test administrator as per the following sketch. The specimens should be approximately 1 ½” in width and ground flush on both sides with edges de-burred. Candidates may radius the corners of the specimens to 1/8” maximum.
Each bend test specimen shall be die stamped by the examiner for positive identification. On the “face side” of the coupon each bend test specimen shall be die stamped with the test identification number and the test position (2=2G, 3=3G, 4=4G) at one end, and the test specimen identification at the other end as follows: face bend =1, root bend = 2.
Excessive grinding that reduces the thickness of the specimens below the nominal thickness shall result in the test being considered as a failure.

Standards for the evaluation of bend test specimens
The guided bend tests shall have no open discontinuity in the weld or heat affected zone exceeding 1/8” measured in any direction on the convex surface of the specimen. Open defects occurring on the corners of the specimen during bending shall not be considered unless there is evidence that they result from slag inclusions, lack of fusion, or other internal defects.
A failure of a face or root bend test specimen shall result in a failure of the weld performance test in the test position of the coupon from which the test specimen was removed. A candidate failing a weld performance test in only one position may do an immediate retest by welding a fourth test coupon in the same position as the coupon from which the failed specimen was removed. The candidate will have one hour to complete the weld of the test coupon in the failed welding position. Two test specimens shall be removed and a root bend and face bend tests carried out. If the fourth coupon welded in the failed position meets the evaluation the candidate shall pass the examination.
If the fourth coupon welded in the failed position fails the evaluation, the entire examination shall be considered a failure.
A candidate failing a weld performance test in more than one position fails the examination and must retake the complete examination and weld 3 test coupons in the 2G, 3G and 4G position.
Regardless of exam result, the examiner shall issue an exam record to the candidate and maintain a copy for auditing purposes for a period of 7 years.
Candidates who successfully complete the examination may apply for a class IT pressure welder certificate of qualification.
Candidates failing the examination
A candidate failing to pass the examination for a Class “IT” Pressure Welder Certificate of Qualification on their initial attempt may not take the examination again until 30 days after the previous examination.
If a candidate fails to pass the examination on their second attempt, or any subsequent attempt the candidate may not take the examination again until 60 days after the previous examination.
Candidates passing the examination
The Examiner shall complete and certify the Examination Record (FRM-1695) for each candidate passing the examination.
The Examiner shall record the results in the ITA Welder’s Log Book as follows: date of examination, WPQT number, welding processes, Class “IT” PW C of Q Exam-Passed followed by the Examiners name, signature and certifying body (CWB / ABSA) registration number and the name of the Recognized Test Administrator and identification number.
Once the above is completed, Technical Safety BC will issue a Class “IT” Pressure Welder’s Certificate of Qualification wallet card to the successful candidate. A Class “IT” Pressure Welder’s Certificate of Qualification is valid for three years.
The Class “IT” Pressure Welder Certificate of Qualification is not renewable.
The Examiner shall retain a copy of the completed and certified Examination Record and provide the candidate with the original Examination Record.
Candidates responsibilities
The Candidate shall be responsible to submit the completed Application form (FRM-1693) and completed and signed Examination Record (FRM-1695) and required fee within 24 hours to Technical Safety BC (via the online service) who will process and issue a Class “IT” Pressure Welder Certificate of Qualification.
Performance qualification testing
The class IT pressure welder certificate of qualification performance qualification test shall not be used for production pressure welding.
When the candidate has received their class "IT" Pressure Welder Certificate of Qualification from Technical Safety BC they will be eligible to complete additional performance qualification tests following any Licensed Contractors Welding Procedure Specification registered with Technical Safety BC for any welding process for manual or semi-automatic welding (Note: testing to PWPs or other open welding procedures is not permitted).
The essential variables outlined in QW-350 of ASME Section IX shall be in accordance with the class IT pressure welder certificate of qualification except, it is permissible to change the welding process, direction of travel regarding up/down or filler metal.
A current class IT pressure welder certificate of qualification must be available at the job site where pressure welding is being performed in addition to the Industry Training Authority Welders Log Book and QW 484 test records. The continuity section of the Welders Log Book must be current in accordance with the requirements of ASME Section IX for the applicable welding process.
Reference Syllabus: SYL-BP-104-01